

How to Reserve Seats with a Japan Rail (JR) Pass in 10 Steps

Listen, if you do not want to end up playing musical chairs on Japan’s Bullet Train (Shinkansen) read this…
What is the JR Pass, Who Should Get One & When Should you Activate It…
The JR Pass, officially called the Japan Rail Pass, is a multi-day train pass designed specifically for international visitors. It allows unlimited travel on most JR-operated trains across Japan, including many Shinkansen bullet trains, regional trains, and airport lines.
Instead of purchasing individual tickets for each route, the JR Pass gives you the flexibility to move between cities without worrying about constantly buying new fares. For travelers visiting multiple cities like Tokyo, Nagano, Kyoto, and Osaka, it can save hundreds of dollars while simplifying the entire experience.
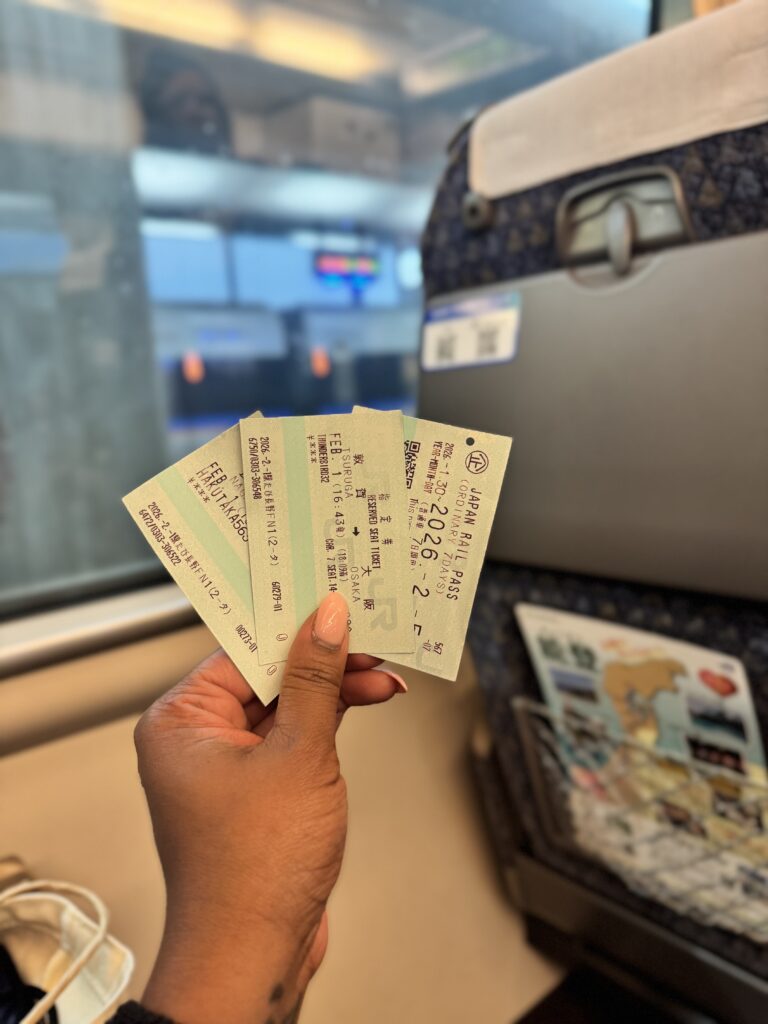
I purchased mine online on the Klook App and they were mailed to me in Atlanta 2 business days later with instructions on how to activate them once I entered Japan.
The JR Pass is ideal for travelers who are:
- Traveling through Japan for 7+ days
- Visiting more than one major city
- Taking at least one Shinkansen bullet train
- Needs flexibility with transportation
There are three main duration options available:
- 7 consecutive days
- 14 consecutive days
- 21 consecutive days

Strategic Activation
These days run consecutively from the moment you activate the pass, not from the day you arrive in Japan. For my 10-day trip, we activated our 7-day passes on the 3rd day (our first Shinkansen ride). That allowed our passes to last until our last day in Japan. If we had activated it earlier while staying in one city, we would have wasted valuable days.
Seat Reservation
Seat reservations on Shinkansen trains are included at no extra cost with the JR Pass. Reserving seats would have saved us from playing musical chairs across multiple train cars on our first ride on the Bullet Train.
I’ll tell you the story further down in the post…
Seat reservations guarantee that you can sit together, store your luggage comfortably, and relax immediately after boarding the train.
The entire reservation process takes about 5 minutes at the kiosk.
How to Reserve Seats w/ Your Physical JR Pass
Step-by-Step Guide

- Start by locating the green Reserved Seat Ticket Machines, called Midori-no-kenbaiki, inside JR stations. These machines have QR scanners and English language support.

- Tap English in the upper right hand corner of the screen.

- Select “Read QR code” and scan the QR code on your JR Pass when prompted.

The scanner should be on your right.

- After a confirmation screen about the JR Pass, choose “Select Train to Use Now”

- Next, select the number of people in your party and get ready to input your passport details.

- Enter your full passport number. The system will match this to your JR Pass.

- Enter your route details. Select your departure station, arrival station, travel date, and departure time. The machine will show a list of available trains. Choose the one that fits your schedule.

If you aren’t sure about your arrival station, use Google Maps.

- Select the Green Circle to chose your seats

- Select seats from the Seat Map (its just easier.)

- Choose a train car with available seats (marked with the green circle), then select an available seat on the next screen.

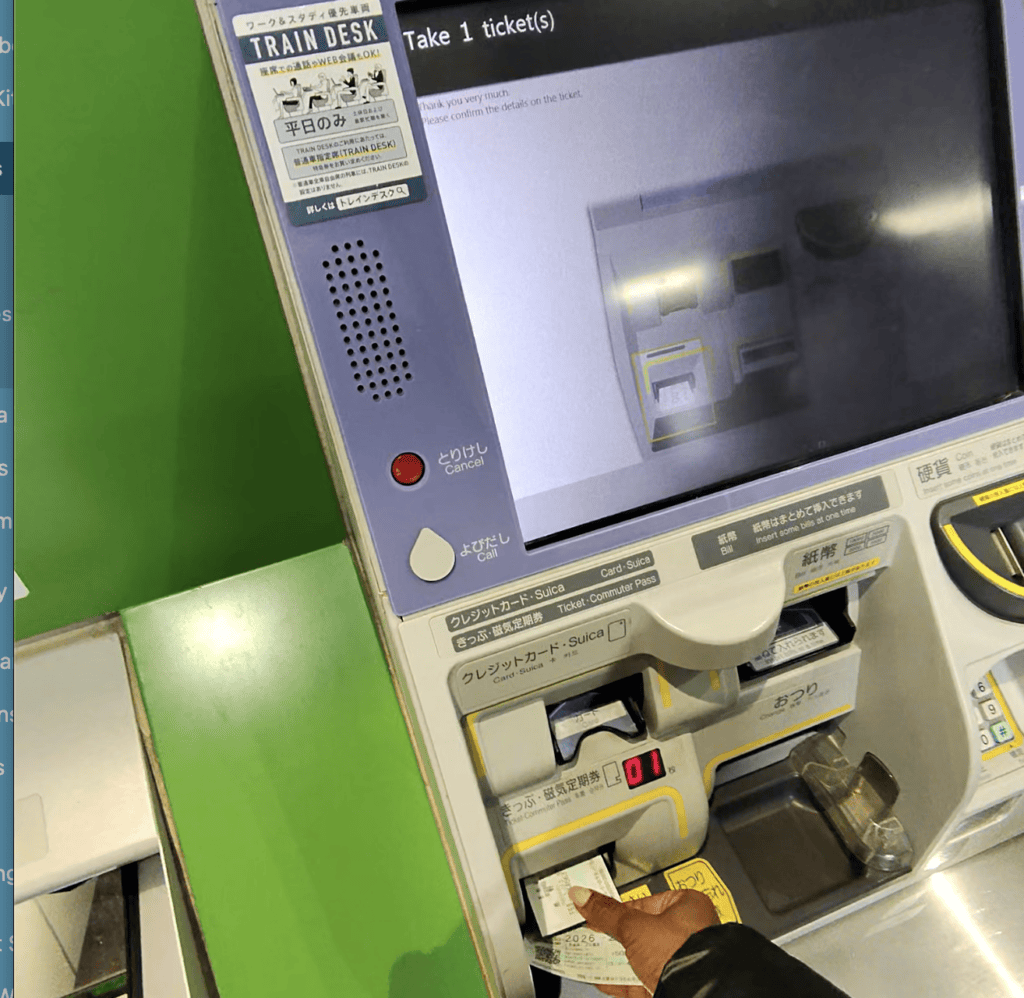
And, That’s It!
A ticket will print out showing proof of your reservation. However, you will still need to scan your JR Rail Pass at the turnstile to board the train.
Heads up on Luggage…
If your suitcase is large, reservations become even more important. Standard luggage can be stored overhead or in front of your seat. Larger suitcases and gear require seats with oversized baggage areas on certain Shinkansen routes. These seats are only available in reserved cars, which means reservations are essential if you’re traveling with large luggage.
What the JR Pass Doesn’t Cover…
Using a Suica Card for Local Trains
While the Japan Rail Pass covers most long-distance and JR-operated trains, it does not cover many local subway systems, private railways, or city transit lines. This is especially true in major cities like Tokyo and Osaka, where multiple rail companies operate alongside JR.
For those everyday rides, we relied on a Suica Card and it made navigating local trains effortless.

Suica is a prepaid transit card that works across trains, subways, and even buses. The best part is that you can add it directly to your Apple Wallet and use it instantly. Android folks, I don’t know what y’all do… but I believe there is an app for it!!
I added about 3,000 yen (roughly $20 USD) to my Suica card at the start, and that covered most of my local train rides for the week. Fares within cities are super affordable, and the balance lasted longer than I expected.
When I needed more, reloading was simple. You can add funds directly from your phone in seconds, which is especially helpful when you’re moving quickly between trains.
Heads Up…
You May Not Be Able to Add Funds Until You Arrive in Japan
I was able to download the Suica card into my Apple Wallet before leaving the U.S., but I couldn’t add money to it until I physically arrived in Japan. Once I landed, everything worked immediately and reloading became seamless.
Having an eSIM Made the Entire Process Seamless
I used an eSIM from Airalo for the entire trip. This kept my phone connected to local data at all times.
Reliable connectivity allowed me to:
- Reload my Suica card instantly
- Access Google Maps for train routes
- Navigate stations confidently
- Adjust plans in real time
Japan’s train system is incredibly efficient, but stations are large. Having immediate access to maps, schedules, and payment made every transition smoother.
JR Pass vs Suica Card: When to Use Each
| Situation | What to Use |
|---|---|
| Traveling between cities (Tokyo → Nagano → Osaka) | JR Pass |
| Local subway rides within Tokyo or Osaka | Suica Card |
| Short-distance local trains not operated by JR | Suica Card |
| Airport trains covered by JR | JR Pass |
| Everyday local transit | Suica Card |
Once you have both set up, navigating Japan’s train system becomes pretty simple.
So here’s the story about what happened…
There’s a very specific kind of panic that happens when you realize you are sitting in someone else’s seat… on a moving bullet train… in a country where everything oozes with order…
This was us. Embarrassed. At least I was!
Four Black women. Eight suitcases. Four JR Passes. And, zero seat reservations. We definitely stood out as “those tourists.”

When we picked up our JR Pass at Tokyo Station, we were cutting it dangerously close to the next departure time. So naturally, we did what any first-time visitors would do… We went straight to the platform and boarded the first open door we saw without hesitation.
We made it!
In my mind, the majority of train would be open seating and the first car or two might be the “reserved first class” car. So, all we needed to do was find space…sit down…settle in.
And at first, that plan worked. We found seats together, stacked our bags, and looked out the window happily on our way to Nagano, Japan.
Then at the next stop, 3 people approached us. We were in their seats.
They all bowed slightly and politely showed us their tickets with the seat numbers printed clearly on it. We whipped out our own JR passes and realized that there was no seat reservation information.
Apologizing, we gathered our luggage, and started moving forward to the next car. We were in car 8, and needed to get to car 3 where there was unreserved seating.
On the way we noticed that there were plenty of seats so we found four more empty ones and sat down again… But each time when the train stopped, we were in someone’s seat.
We moved to the next car. Then the next. Then the next until we got to Unreserved Car 3. Once we got to car 3, we waited for seats to become available at the next stop and then grabbed what was available.
Once seated, the Shinkansen experience became exactly what everyone promises. The train was immaculately clean. It was quiet in a way that feels intentional (we were clearly the noisy ones) and smooth to the point where you forget you are traveling over 180 miles per hour. Outside the window, Tokyo’s dense skyline softened into quieter towns and winter landscapes as we made our way toward Nagano.
What I appreciated in this crazy moment was that no one was rude or outwardly frustrated with us trying to figure our lives out. Chances are we were not the first group of tourists to be seen looking crazy on the Shinkansen Bullet Train… and unless everyone finds this blog post before their trip to Japan, it’s possible that we won’t be the last!

Navigating Japan’s rail system is something you really just have to do to understand. I read so much information in advance and still got there and was utterly confused.
Dragging our suitcases through multiple train cars didn’t feel glamorous at all, but it also taught us the system in a way no guide could. By our next Shinkansen ride, we reserved seats confidently, walked directly to our assigned car, and boarded like pros.
If you’re planning your Japan itinerary, remember this: reserve your Shinkansen seats early, activate your JR Pass strategically, and give yourself the space to learn the rhythm of Japan’s rail system. Once you do, it becomes one of the most peaceful and empowering ways to experience the country.
If you found this article helpful, let us know! And, be sure to check out our other blogs on Winter in Japan!

12 Responses
[…] HOW TO RESERVE SEATS WITH YOUR JR PASS […]
g45uqf
782v16
female viagra
female viagra
fluconazole tablet
fluconazole tablet
dutasteride 0.5 mg capsule price
dutasteride 0.5 mg capsule price
antibiotics
antibiotics
This was a invigorating read. I like content that feels as easy to connect with as a good hair conversation, as practical as styling advice, and as sensible as beard and personal care habits, with the same confidence you want from a salon visit, a clean shave, or careful shaving.
I enjoyed how thoughtful this felt. It brought to mind the way hair teaches patience, with styling experiments, shampoo choices, conditioner habits, beauty expectations, salon experiences, and gradual growth all shaping the outcome.
topical finasteride
topical finasteride
ym9hb6
ryezwmuggiutjwoxzhpjndtigeyows